Managing and Uninstalling plugins
This document explains you how to verify which plugins are installed on your machine, and how to disable or uninstall plugins that you are not using.
This is important to manage the amount of disk space that Eclipse uses and because the Eclipse UI tends to become cluttered when many plugins are installed. A large number of plugins may also make your Eclipse environment less stable. In general, if you are not using a plugin, it is a good idea to disable it.
Disabling a plugin means that it will not be loaded when Eclipse starts. Disabling a plugin is equivalent to uninstaling it, except that the plugin is still available on your hard drive in case you want to reinstall it later.
Reviewing installed plugins
It is easy to verify which plugins are currently installed on your installation of EasyEclipse.
Select the menu item Help -> Software Update -> Manage Configuration, as shown here:

(Note that the screenshots have been done on Mac OS X, but the behavior is similar on other platforms).
Selecting this menu item opens the Distributions Configuration dialog.
You can resize the left pane, and expand the tree, to see all the installed components,
as shown here:

Note that you have to expand the tree: in EasyEclipse, each plugin is install in a separate folder and appears
in a different branch of the tree view. We will fix this in the coming version.
Disabling EasyEclipse Plugins
It is a good idea to disable or uninstall the plugins that you do not use.
It will avoid cluttering the User Interface (too many buttons, menus, views...); it will make Eclipse's behavior easier to understand (in particular, in selecting which editor opens a document type). It will also improve the performance and "snappiness" of Eclipse.
Even more importantly, it will avoid potential problems with plugin conflicts, bugs, crashes...
To disable a plugin:
- Open the
Product Configurationdialog as described in the previous section, - Find the plugin that you want to disable, by expanding the tree on the left pane,
- Right-click on the item (or on the parent folder: this is equivalent) and select
Disable: - Select
Yesin the confirmation dialog, - Select
Yesin the dialog asking you to restart Eclipse.

Note that if all plugins from the original distribution appear under the first directory. To disable a plugin from the original distribution, expand the first directory, and disable only that plugin:

Workbench failed to restore its state.
This may happen if a re-opened document was relying on the plugin for its display.
Those errors are innocuous. Once you have closed and reopened the document,
the problem should not occur anymore.
Later, you can re-enable a plugin if you need it. To re-enable a plugin, execute the following steps:
- Open the
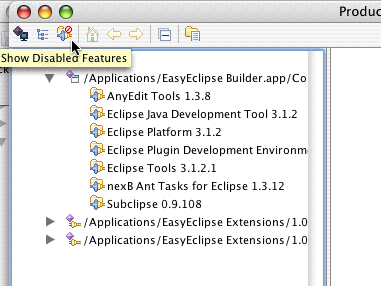
Product Configurationdialog, as described in the previous section, - Show the disabled plugins by pushing the "Show Disabled Features" button:
- Find the plugin that you want to enable, by expanding the tree on the left pane, as described in the previous section,
- Right-click on the disabled item and select
Ensable, - Select
Yesin the confirmation dialog, - Select
Yesin the dialog asking you to restart Eclipse.

Uninstalling EasyEclipse Plugins
On Windows
Plugins can be uninstalled through the Add or Remove Programs
in the Control Panel. However, it is a good idea to
disable the plugins before uninstalling them.
On Mac OS X and Linux
Once you have disabled the plugins, you can simply delete the folder that contains them. On Mac OS X, this folder is located in/Applications/EasyEclipse Extensions/1.0.0/.
Uninstalling EasyEclipse Distributions
On Windows
Distributions can be uninstalled through the Add or Remove Programs
in the Control Panel.
Uninstalling a distribution also uninstalls all the plugins it contains.
On Mac OS X and Linux
To uninstall, you can simply delete (send to the trash) the folder or icon for EasyEclipse.
Uninstalling a distribution does not remove the plugins that you have added to it. You can remove those plugins as described in the previous section.